STRUCTURAL
BOLTING METHODS
TURN-OF-NUT BOLTING METHOD
Turn-of-Nut (Part Turn)
Note: As with every bolt pretensioning method, Turn-Of-Nut may only be performed after all steel plies in a connection have been drawn into firm contact, i.e. snug-tightened. Failure to do so will result in inadequate bolt pretension and loose connections. Also, The Pre-installation Verification fastener testing must be conducted per applicable AISC/RCSC sections with the caveat that Turn-Of-Nut verification may not verified by Direct Tension Indicator verification (AISC/RCSC 59).
Turn-Of-Nut is performed by rotating the nut or bolt of a fastener assembly a specific turn angle based on the fastener's length, and diameter while restraining the unturned element from rotating.
Bolting Methodology
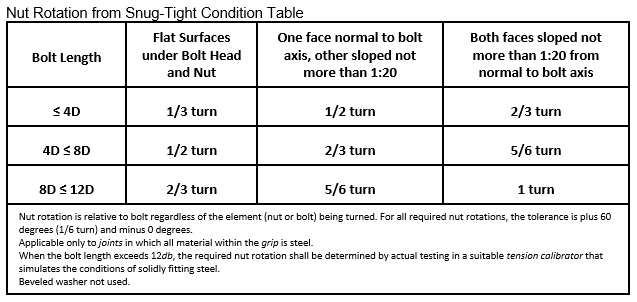
- Determine the ratio between the fastener's length and diameter as well as the slope disposition of the outer steel plies.
- Snug the steel plies, in as many steps as necessary, to bring the steel into firm contact as required by AISC/RCSC section 8.1.
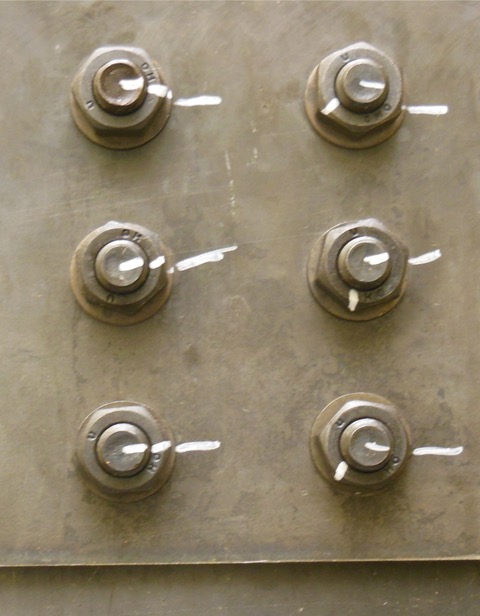
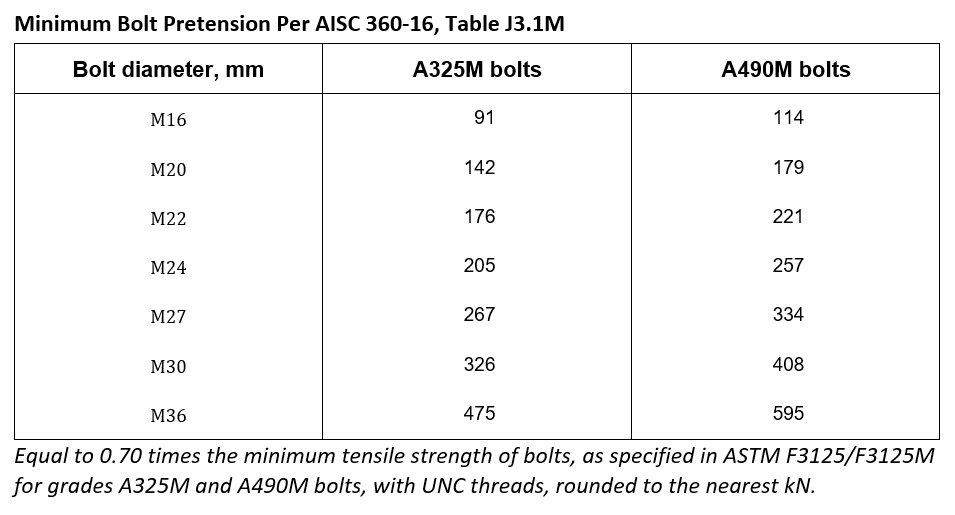
- Using a marker, or similar, draw a mark from the center of the end of the bolt, across the nut, and onto the steel. This will indicate the starting position of the nut.
- Apply the specified turn from the appropriate table, or from tension calibrator testing, while the unturned element is restrained from rotation (usually requiring a second installer).
- Rotation exceeding the table can be ignored and may not be corrected or reworked except by replacing the fastener assembly.

Figure 1: Marked nut, bolt & steel, before and after 2/3 turn.
For reference, values from table 8.1 of the Research Council on Structural Connection's (AISC/RCSC) Specification for Structural Joints Using High Strength Bolts, 2020
Inspection:
The inspector MUST:
- Verify pre-installation verification has been performed.
- Verify the joint has been snug-tightened.
- Verify the original position of all elements.
- Routinely witness the installation crew turning the nuts/bolts.
- Verify the final rotated position of all elements.
- Prohibit excessive rotation discovered or witnessed from being adjusted to reflect turn values from table 5.2.
The inspector MUST NOT:
- Use a torque wrench as an inspection tool. Inspection is only as described above, verifying initial position at snug and final position after nut is turned.
- Assume marking was applied prior to turning. Tightening and THEN marking the nut, after the turn is a very popular way to perform Turn-Of-Nut and is an undetectable deception, if initial position marks are not observed by the inspector.
- Instruct bolting crews to back off any turn that is greater than what appears in the table. Over rotation is not a cause for rejection or rework. Compensating for over rotation, by backing the nut off, will result in less than the required pretension.
While it is recommended that the bolt, nut, and steel be marked and inspected prior to Turn-Of-Nut implementation, this step is not mandatory. In any case, failure to inspect nuts in their original (snug), un-turned position will result in unverifiable Turn-Of-Nut execution. Nut marking does not relieve an inspector's responsibility to inspect the connection twice, before and after the turn. A pretension that is greater than the [required] value shall not be cause for rejection.5
Advisories:
Ineffective for some bolts, The Guide:Users of large diameter high-strength bolts, especially A490 bolts, should be aware that the AISC/RCSC specification requirement for installation of short grip bolts may not produce the required preload [pretension]. If such bolts are to be used in a slip-resistant joint [i.e., slip critical and pretensioned], calibration tests in a load-indicating device are advisable. (Kulak 59)6
Hot Dipped Galvanizing, AISC/RCSC:Some problems with the turn-of-nut pretensioning method have been encountered with hot-dip galvanized bolts. In some cases, the problems have been attributed to an especially effective lubricant applied by the manufacturer to ensure that bolts and nuts from stock will meet the ASTM Specification requirements for minimum turns testing of galvanized fasteners. (AISC/RCSC 61-62).
Bolt Lubrication too effective or absent, AISC/RCSC:Specification requirements for minimum turns testing of galvanized fasteners. Job-site testing in the tension calibrator demonstrated that the lubricant reduced the coefficient of friction between the bolt and nut to the degree that "the full effort of an ironworker using an ordinary spud wrench" to snug-tighten the joint actually induced the full required pretension. Also, because the nuts could be removed with an ordinary spud wrench, they were erroneously judged by the inspector to be improperly pretensioned. Excessively lubricated high-strength bolts may require significantly less torque to induce the specified pretension. The required pre-installation verification will reveal this potential problem.
Conversely, the absence of lubrication or lack of proper over-tapping can cause seizing of the nut and bolt threads, which will result in a twist failure of the bolt at less than the specified pretension. (AISC/RCSC 61).
AISC/RCSC section 9.1 snug-tightened inspection criteria flawed:AISC/RCSC section 9.2.1 requires the inspector to witness one element being rotated relative to the other. If not, improper pretension may result if an installation crew only applies the minimum amount of snug-tightening per section 9.1, Snug Tightened Joints:
9.1 ...It shall be determined that all of the bolts in the joint have been tightened sufficiently to prevent the turning of the nuts without the use of a wrench. No further evidence of conformity is required for snug-tightened joints.
If only hand tightening is used as a snug inspection criterion, it is possible for Turn-Of-Nut’s initial starting point, (i.e. adequate snug) will not be achieved and the method will fail. Such failures will not depend on whether fasteners were marked or not.
Canadian Institute of Steel Construction, i.e. CISC, Turn-of-Nut
Installation:
The CISC Turn-Of-Nut installation method is similar to AISC/RCSC Turn-Of-Nut with a few exceptions.
- Required turn values are the same when both faces normal as well as when one face is sloped 1:20.
- 3/4 turn to be applied to all instances, when both faces sloped 1:20.
- The acceptable rotation tolerance is ±30°.
- Beveled washers are required when either steel ply is sloped 1:20 Max when using ASTM A490 and A490M bolts.
- CISC Turn Table 8 does not limit itself to 12” maximum bolt length, as the AISC/RCSC does.
- When both surfaces sloped 1:20 max, all bolts rotated 3/4 turn (AISC/RCSC requires length dependent turn values).
For a complete turn details, please refer to the Nut Rotation from Snug-Tight Condition table within the latest CISC Handbook of Steel Construction.
Inspection:
The inspector MUST:
- Verify pre-installation verification of all assemblies has been performed.
- Verify the joint has been snug-tightened.
- Verify the original position of all elements.
- Verify the final rotated position of all elements.
- Routinely witness the installation crew actually turning the nuts/bolts.
- Prohibit excessive rotation discovered or witnessed from being adjusted to reflect turn values from the applicable table within the CISC handbook.
While it is recommended that the bolt, nut, and steel be marked and inspected prior to Turn-Of-Nut implementation, this step is not mandatory. In any case, failure to inspect nuts in their original (snug), un-turned position will result in unverifiable Turn-Of-Nut execution. Nut marking does not relieve an inspector's responsibility to inspect the connection twice, before and after the turn.
CISC Advisories:
See advisories for AISC & RCSC.
Additional Advisories:While the CISC does not specifically require Pre-installation Verification testing of all fasteners when using Turn-Of-Nut per se, testing is recommended to assure hardware compliance with the appropriate ASTM Specification. Thread failure (stripping) will not be discernible otherwise.

DTIs and Turn of Nut:
While DTIs may not be used when the chosen bolting method is Turn of Nut, adding a DTI to a structural bolting assembly changes the bolting method to a DTI installation. This does not mean Turn of Nut methodology cannot be applied to a DTI installation.
Tools designed to perform Turn of Nut independently will complement DTI installations by providing a means to limit overzealous or lackadaisical tool operators. The only requirement is the turn angle will need to be increased to account for the DTI gap closure absorbing some of the turn angle. This is especially useful when bolting per federal highway or state DOT standards because such standards often require DTIs to have at least a visual gap, after tightening. With a “Turn of Nut” tool, a turn angle that results in at least one visible gap, can easily be dialed in. Lastly, using a tool specifically designed for Turn of Nut, will not require match-marking the bolt prior to the turn since compression of the DTI, verified the appearance of orange media, will denote tool application, i.e., adequate tension.
It is also possible to use a tool that does not have an angular setting by marking the tool’s socket at two places @ 180° degrees apart. The tool is placed on the fastener with one of the markings facing up and the other facing the ground. Next, tighten the bolt in 90° increments until orange media appears at all available bump locations of the DTI, erring on the side of more flat bumps is better.
For installations following the AISC/RCSC specification, it is permitted to leave the DTI completely flat, with all feeler gage entry points closed. However, when following some highway and DOT specifications, at least one feeler gage entry point or a visible gap may be required. If so, determine the angle, in 90° increments, that satisfies all gap constraints.
5. AISC/RCSC 9.2.1 "A pretension that is greater than specified in table 5.2 shall not be cause for rejection."
6. Guide. The Guide to Design Criteria for Bolted and Riveted Joints, 2nd Edition (Kulak et al., 1987).